The winged eyeliner is a timeless beauty trend that has the power to elevate any makeup look. However, mastering the art of the winged eyeliner can be a daunting task, especially for those who are new to the world of makeup. But fear not! With the right tips and tricks, anyone can achieve the perfect winged eyeliner that enhances their eyes and adds a touch of glamour to their overall appearance. In this essay, we will explore some helpful techniques that will assist you in achieving that coveted winged eyeliner look.

First and foremost, it is crucial to choose the right eyeliner product. There are several options available in the market, such as liquid, gel, and pencil liners. While pencil liners may be easier to control for beginners, liquid and gel liners are the most commonly used for achieving a sharp and precise wing. Liquid liners typically come with a fine-tipped brush or felt-tip applicator, making them ideal for creating clean and crisp lines. Gel liners, on the other hand, require a separate brush for application but offer excellent control and long-lasting results. Whichever product you choose, ensure that it is highly pigmented and has a smooth texture to facilitate easy application.
Before beginning the application process, it is essential to prepare your eyelids. Start by applying a thin layer of eyeshadow primer or concealer to even out the skin tone and create a smooth canvas for the eyeliner. This step helps to prevent smudging and ensure longevity. Additionally, if you have oily eyelids, dusting a translucent powder over the primer can further aid in preventing the eyeliner from transferring or smearing throughout the day.
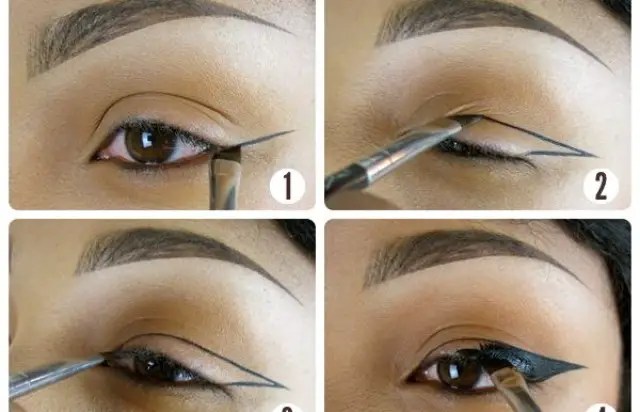
Next, it is time to create the winged shape. There are several techniques you can utilize, depending on your eye shape and personal preference. One popular method is the "tape trick." Cut a small piece of tape and place it diagonally from the outer corner of your eye towards the end of your eyebrow. This acts as a guide and helps to create a precise and symmetrical wing. Another technique involves using a thin makeup brush or an angled brush dipped in concealer or foundation to draw a guideline for the wing. This guideline can be easily corrected or adjusted before proceeding with the eyeliner.
Now comes the actual application of the eyeliner. Start from the inner corner of your eye and work your way towards the outer corner. For a precise and clean line, it is recommended to use small, controlled strokes instead of attempting to draw the entire line in one go. This allows for better control and minimizes the chances of making mistakes. If using a liquid liner or a gel liner, it is advisable to start with a thin line and gradually build up the thickness according to your desired intensity. Remember, it is easier to add more product than to remove excess liner. To create the wing, extend the line upwards and outwards from the outer corner of your eye, following the guideline you previously created. The length and angle of the wing can vary depending on your preference, eye shape, and the overall look you want to achieve.
In case of any mistakes or uneven lines, a quick fix is to use a cotton swab dipped in makeup remover or micellar water to clean up the edges and create a sharper wing. Additionally, using a small, angled brush with some concealer or foundation can help to refine and shape the wing further for a more polished finish.
Lastly, to complete the winged eyeliner look, consider curling your lashes and applying a coat or two of mascara to add volume and definition. This step will help to enhance the overall appearance of your eyes, making them look more open and captivating.


Leave a Reply